
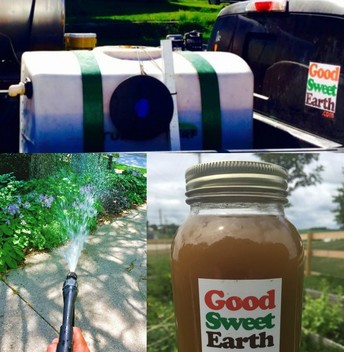
 If you’re familiar with compost tea, our Worm Tea is similar, except instead of using traditional hot compost (or thermophilic compost), we use our own Living Worm Compost. Our Worm Tea is sold by the gallon to backyard gardeners for flowers, fruits, veggies, shrubbery and as a compost pile activator. It’s also used by farmers on their crops as a microbial drench and anti-fungal agent. Finally, we use it on lawns.
Before we get into how we make our Worm Tea, let’s look at different types of microbial tea and the different methods of making it. Then we can get into how we do it, and why we do it that way. The basic recipe of compost tea consists of compost (the source of the beneficial microbes), a food source for the microbes (typically molasses) and water (distilled, rain or well water; using municipal water straight from the tap can kill the microbes because of added chemicals like chlorine). Other things can be added to give the finished product a more complex microbial population or nutrients. But those are the basics. For a simple recipe, just throw a pound or two of compost into the bottom of a five-gallon bucket, add a half cup of black strap molasses and fill the bucket with distilled water. Let it sit in the sun for a few days, and you’ll begin seeing some film, froth and bubbles. This is evidence of your microbial population growing. You could simply add this to your plants and soil. The problem with this method is it’s a little haphazard. First, it’s anaerobic, meaning there’s no added oxygen, so you can often end up with dangerous microbes. Second, traditional hot compost isn’t very uniform. It might not be completely “finished” (meaning it might contain pathogens or materials that aren’t necessarily beneficial), it could be too “finished” (meaning it lacks any sort of nutrients), and since different materials break down differently, every batch of hot compost is completely different from the next. To create a safer compost tea, you could consider adding oxygen by way of an aquarium or pond aerator. Simply use the ingredients from above, but then plunk some aeration stones attached to an aerator and let it bubble for a couple days. This will give you an aerobic (active in the presence of oxygen) tea. The problem you might face now is a product that doesn’t come out of a spray bottle cleanly. With your compost simply tossed into the bucket, you’re going to have chunks and slurry in the finished product. To fix this, use an old pair of panty hose. Or a burlap sack. So now comes the question: What’s the difference between tea made with traditional hot compost and tea made with vermicompost (like our Living Worm Compost)? Difference #1: Vermicompost is completely “finished.” You never have to worry about semi-composted chunks of matter (sometimes containing pathogens) getting into your tea. When a worm eats the organic material and poops it out, it’s done. It gives you a more uniform result because vermicompost itself is more uniform than hot compost. Difference #2: Unlike traditional hot compost, which often has all the nutrients leach out or get destroyed by the high temperatures, vermicompost still contains trace amounts of nutrients. That’s good for your plants. At the end of the day, tea—whether it’s made from hot compost or vermicompost—is meant to give your soil and plants a boost of microbes. Those microbes, both fungi and bacteria, help break down organic matter in your soil and serve as an anti-fungal agent. Without life in your soil, your plants will suffer. So now on to how we make our Good Sweet Earth Worm Tea: We use specially-made compost tea bags that we fill with our Living Worm Compost. We also add a special blend of alfalfa meal and kelp for added growth hormones and iron, respectively. To that we will add black-strap molasses. We add the water from our underground aquafer (fancy way of saying “our well”) and turn on the large pond bubbler. The whole thing is done inside our 100-gallon tank, which we can use to apply it directly to lawns, transfer into a farmer’s irrigation tank, or put into jugs and buckets for individual use. We let the tea brew for between 24 and 72 hours (earlier in the season, when temps are still cool, it takes longer to get the microbe population up to where it needs to be; in mid- to late-summer, the microbes multiply faster in the heat). Now when it comes to brewing our Worm Tea for use on lawns, we’ll at times add other ingredients based on the needs of a customer’s turf at any given time. Sometimes we’ll add more kelp extract, sometimes we’ll add another bit of alfalfa. If we want more a more fungal tea (not typical for lawns), we can add oats or spent distillers grains. If we want a more bacterial tea (good for lawns), fish emulsion or additional sugars (maple syrup, cane sugar, etc) can be added. For the tea that we sell at farmers markets and on our website, our recipe is pretty standard: Living Worm Compost, aquafer/rain water, kelp, molasses, alfalfa meal. This is the recipe that we’ve found gives the best results, and it keeps things consistent for everyone that uses it. And there it is. It sounds relatively simple, and at its core, it is. However, what we’ve been working on over the past several years is ingredient ratios, brew time and oxygen levels. And that’s where we feel like we’ve hit the sweet spot. If you’re interested in purchasing our tea (available only in West Michigan), check out our product page. Be aware: Since it does contain living organisms, you will need to use it within 8 hours of getting it.
0 Comments
Your comment will be posted after it is approved.
Leave a Reply. |