 Whether this is your first year gardening or you’ve gardened your whole life, I can’t stress enough the importance of having a garden journal. Let’s be honest: every year we think we’ll remember that awful variety of tomato we grew or that amazing variety of eggplant, but when the next spring rolls around, our minds completely draw a blank. Or worse, we think we remember the right variety so we buy a seedling only to be disappointed again at harvest time. And this my friends is where your garden journal becomes an essential gardening tool.
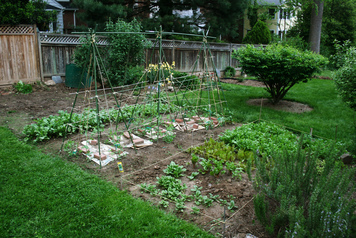
In my garden journal I put a sketch of my garden plan and all of its successions. This is important for crop rotation in future years. I also make note of each variety of plant in my garden and the date I planted it. And be specific, don’t just say “large tomatoes” but “Better Boy Tomato,” and then note what you and your family liked or disliked about that tomato variety. Maybe the plant was a great producer or perhaps the taste wasn’t as rich as you like. If you don’t love a variety then don’t grow it again! There are too many amazing plants out there to settle for something mediocre. Also take the time to note which pests you dealt with this season. For me it’s important that I remember that I had wireworms this year and that I will need to turn my soil early so the birds can feast on any pests that survived the winter. I’ll also need to apply beneficial nematodes before planting to take care of the rest. I am also dealing with Japanese beetles so we’ll apply milky spores this fall, but my garden journal will remind us to do it again in the spring. Noting how you feed your plants is also vital to success from year to year. How many pounds of living worm compost did you use? Did you top dress? How regularly did you apply worm tea? Did you use any additional fertilizers, and how did they work? It’s helpful to note any failures you have in your garden this season. Did you plant your eggplants too close together? Perhaps you miscalculated how long it would take your cabbage to mature and thus planted your peppers later than you wanted. And note your successes too! Did that new trellis work like a charm? Perhaps all your succession planting went exactly as planned. Write it down so you have it for the next go around. A garden journal may seem like an added task to an already busy season, but it will be worth the work when you can’t remember that amazing variety next spring or can’t remember exactly where you planted those potatoes two years ago. Plus, if you keep your journals from year to year, you might actually surprise yourself on what a great gardener you’ve become. So if you haven’t started your garden journal for this season it’s not too late—just get a notebook and start jotting. Happy gardening!
0 Comments
 The term crop rotation seems like a daunting concept and something that only farmers need to think about. Well I have news for you— if you’re planting things in your yard then that makes you a yard farmer, and crop rotation is something you need to think about if you want a healthy yard! So let’s break down the basics of crop rotation together.
First off, what is crop rotation? Simply put, it's planting your tomatoes in a different spot than you did last year. You are rotating the placement of your crops throughout your garden from year to year. Why rotate crops in my garden? By rotating where you place each type of plant, this reduces pathogens and pests in your soil. If a certain pest likes tomatoes, and you plant tomatoes in the exact same spot year after year, eventually that pest will set up shop because you’ve created a consistent place for it to live and thrive. Moving plants around also improves soil structure and nutrient levels. For instance, if you put peppers in the exact same spot year after year, the peppers will eventually drain your soil of the very nutrients they need to live. In a nutshell by rotating where you plant things, you will deal with less pests and diseases and have healthier soil. How do I rotate the crops in my garden? Simple: note what you planted where this year, so that next year you can move things around. Draw a picture of your garden before this season is done, so when you go to plant next spring, you won’t have to guess. It’s helpful to note which biological family each plant belongs to since members of the same family are susceptible to the same pests and diseases. From there, design your garden based on these guidelines:
Finally, not sure how to shake things up? Good Sweet Earth offers a personalized Garden Pro Service. Click here to learn more. As always happy gardening! The pest I’m hearing about most from west Michigan gardeners this year is Japanese beetles. These pesky little copper-colored beetles especially love roses and apple trees—both of which we have on our property, so I have been especially interested in monitoring them for activity.
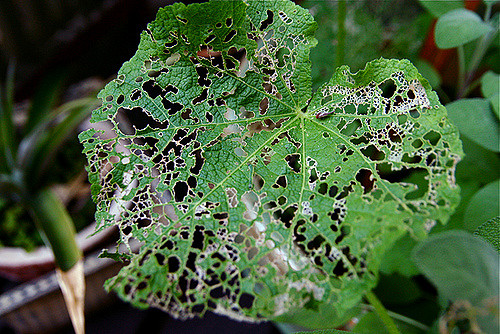
Their telltale sign is leaving “skeletonized” leaves while leaving the veins intact. Unfortunately Japanese beetles are not real picky eaters and will attack almost any flower, shrub, tree, or vegetable plant. My first encounter with the Japanese beetles this year occurred when they showed up on my pole beans; they’ve also enjoyed some of our cucumber plants. So how do we get rid of them without nasty pesticides? First spray your plants with Neem oil. The benefit of Neem oil is it is derived from an evergreen tree and is safe for use around humans, animals, earthworms, lady bugs, and other beneficial insects. Neem oil also protects your plants from a variety of other insects including caterpillars, cabbage worms, mealy bugs, mites and whiteflies, just to name a few. Neem oil can also help with powdery mildew. This is an item I wouldn’t want to start the year without because there is a good chance I will need it at some point during gardening season! Second, Japanese beetles are slow and not all that alert. This makes them easy to catch. Fill a bucket or jar half way with water and a squirt of dish soap. Catch the beetles with your gloved hands and place them in the bucket. They cannot escape from the soapy water. The best time to catch them is early in the morning when they are the least alert although you should have no problem catching them anytime during the day. Also leave the bucket of dead beetles in the garden as a deterrent. Japanese beetles are largely moved by scents and the smell will deter additional beetles. Finally, grubs are the larval stage of the Japanese beetle and the presence of the beetles in your garden or on your roses may mean you or your neighbor have a grub issue. Japanese beetles will travel a mile for a good meal, but if they are in your garden and you didn’t have grubs this spring you may have them next spring. Grubs can be treated organically with milky spores, but the milky spores take a year to effectively establish themselves in your soil. I know we will be applying them this fall to get a jump on any problems with grubs in the future. Now that I’ve given you some good ways to rid your yard of Japanese beetles, here’s what I’d avoid: Japanese beetle traps. Studies have found they attract more beetles than they actually catch. So is there a way to prevent these pests from invading your garden? Well, theoretically, natural repellants for Japanese beetles include chives, garlic, catnip and tansy, but to be honest, I have not found these to be very effective. Directly below my pole beans are my chives, so I’m not convinced planting those things actually works as a deterrent. So while you may not get rid of the all the Japanese beetles in your yard, you can definitely control their population so they will not have an impact on your harvest. 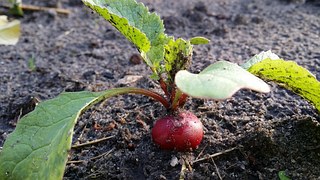 I often hear at Farmer’s Markets that people would love to garden, but spring got away from them and now it’s too late. What if I told you it’s not too late? This is the perfect time to dig out that grass and till your soil or if you prefer raised bed, like I do, let’s get building.
Here on the Good Sweet Earth homestead we are always trying to take steps toward food self-sufficiency and this fall we plan on installing a few more raised beds too. Our raised beds will be earmarked for berries come spring, but this summer and fall we have a few ideas for some fast growing vegetables that we can still plant and harvest this year. August is the perfect time to plant radishes, arugula, baby spinach, lettuce, and snap peas. Radishes take a mere 22 days to harvest and can be grown until the first frost. Snap Peas depending on variety take about 60 days to harvest. If you are feeling adventurous you could even plant some beets, broccoli, kale or swiss chard since all these vegetables take about 60 days to harvest too. Remember the days to harvest is not counted from the day you put the seed in the ground until you harvest but rather once the seed is germinated and growing to harvest. Check your first frost date. Here in Zeeland, Michigan, our first frost date is October 10 which means we have a 50 percent chance of frost. Our short growing season 156 days will come to an end before we know it so let’s make the most of it! Happy (August) gardening! 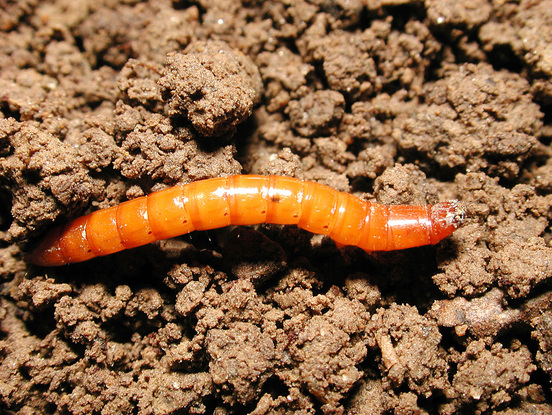 This spring we put two new raised beds in our garden and filled the beds with a mixture of our own Living Worm Compost and a topsoil blend that we purchased from our favorite local supplier. I planted my early crops, weeded and waited.
About a week before my pak choi cabbages were ready to harvest I noticed they were not growing as well as they should have been. So being a curious gardener, I investigated, both above and below the ground! In the soil I noticed a small reddish-brown worm-like creature that I had never encountered before. Folks, my lovely topsoil blend that I bought from our favorite local supplier came with its own batch of wireworms! And wireworms, it turns out, are bad news. They eat the roots of plants, attack seedlings, and bore holes into potatoes, radishes, and carrots. I promptly called the local supplier to let them know they sold me tainted soil and asked them for suggestions on ridding my garden of these nasty critters. Unfortunately their only solutions involved chemicals, and lots of them! No thank you! So like any good Master Gardener worth her weight in compost, I did a bit of my own research. I soon discovered that beneficial nematodes would do the trick and clear these things right up. Now, what in the world is a beneficial nematode you ask? Let me explain. Beneficial Nematodes (Steinernema feltiae) are effective killers of any pest that lives in or on the soil, but they’re safe for humans, pets, plants, and earthworms. These amazing microscopic parasites continue working in your soil for 18 months after application. Some of the 230 pests that beneficial nematodes can destroy include wireworms, white grubs, fungus gnats, and black vine weevils…just to name a few. I ended up ordering my nematodes online since the discovery was made on a holiday weekend and I was unable to find them locally. While I waited for my order to arrive I did try an old-time remedy I found online: I cut a potato in half and stuck a stake in it then buried it in the soil. The wireworms were attracted to the potato and ultimately left my plants alone while I waited for my beneficial nematodes to arrive. (In my opinion, the potato trick was a nice temporary fix, but would not have saved my garden; the beneficial nematodes were absolutely necessary to fix the problem. However, seeing that potato draw in the wireworms did help me feel like I was being proactive while I waited for my nematode delivery.) Like all organic remedies the beneficial nematodes took a few days to work, and I will have to apply them again next season just to be sure I don’t see wireworms again. But that’s a small price to pay for a pest-free, and chemical-free, garden. -Corey Veldheer, Certified Master Gardener and owner of Good Sweet Earth |