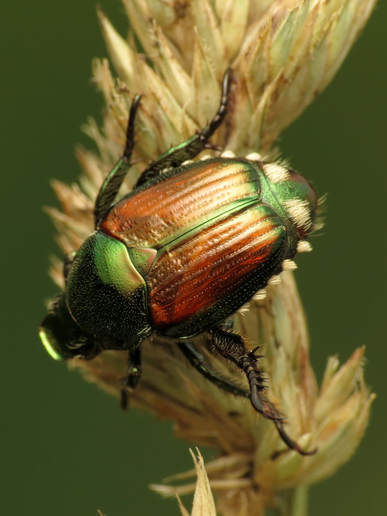
 This is the third story in a three-part series on how to deal with garden pests chemical-free. Garden pests—we all get them, but how do you deal with the pests without spraying chemicals on your food? No worries we are here to help! The final pesky garden pest we'll discuss are Japanese Beetles. I hate to say it, but Japanese Beetles are actually quite beautiful, with blue-green heads and copper backs. These small beetles are about a half inch long, travel in groups, and eat almost any plant. Favorite feasts for this pest include roses, beans, and raspberries. Japanese beetles start out as grubs in your soil then emerge in June as adult beetles. As grubs, they destroy the roots of your grass before coming to the surface to then attack your plants. While their adult life is only 40 days, they can easy destroy your garden if left unchecked. So what is a chemical free gardener to do? Luckily you have quite a few options! I seem to deal with Japanese Beetles every season since moving to West Michigan. Even if you do not have grubs in your soil the Japanese Beetles can easily fly over from your neighbor’s yard. Row covers are quite effective in protecting plants if used during the beetles life cycle. If covering your crops isn't your game, hand picking the beetles in the morning when they are most active is quite easy, as they are quite slow. As I catch the pests, I put them into a bowl of water. If you have chickens, your feathered friends will enjoy the treat. If you are not going to feed the beetles to another animal add dish soap to the water so they cannot fly away. When handpicking just isn’t enough you can spray your plants with Neem Oil. I spray my roses with Neem Oil since handpicking around the thorns isn’t practical. If you see Japanese Beetles in your garden don’t stress! You are now armed with a plan of attack to save your season. Happy gardening!
0 Comments
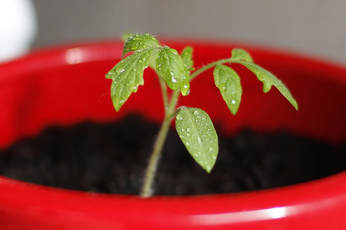 Michigan gives us a glorious six months to garden. Unfortunately, that simply is not enough time for some of our favorite vegetables to be direct sown into the garden. This gives you two options: either start your own or purchase starts from a farm or nursery. If you have a few seasons under your belt and feel confident starting your own here are a few tips and tricks to get you started. First, start off with a quality seed starting mix. Potting soil, topsoil, or soil out of your garden bed simply will not do for starting seeds. You can purchase premixed organic seed starting mix or you can mix your own. We mix equal parts coconut coir, sand, and vermicompost for successful plant starts. Next you want to ensure you have fresh seeds from a reputable source. The older your seeds, the less likely they will germinate. To test the viability of your seeds place 10 seeds evenly spaced between two wet paper towels, roll up the paper towels and seal in a plastic bag. Check seeds in two days to two weeks depending on the seed variety. Finally, timing is everything when it comes to starting seeds. If you start too early your plants can become root bound. On the other hand if you start too late, your seeds will not have the head start they need to reach their full potential. Remember, some vegetables and flowers are best grown by direct sowing including cucumbers, peas, green beans, zucchini, sunflowers and lettuce. Our cool weather crops will go in the ground mid-April depending on the weather. The remaining plants will go in the ground after the last frost on May 16. Happy gardening! 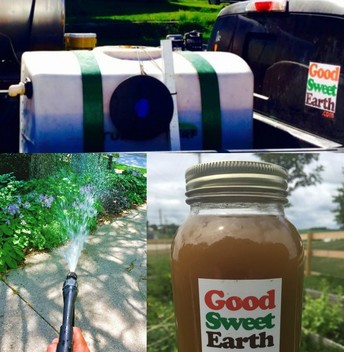 If you’re familiar with compost tea, our Worm Tea is similar, except instead of using traditional hot compost (or thermophilic compost), we use our own Living Worm Compost. Our Worm Tea is sold by the gallon to backyard gardeners for flowers, fruits, veggies, shrubbery and as a compost pile activator. It’s also used by farmers on their crops as a microbial drench and anti-fungal agent. Finally, we use it on lawns. Before we get into how we make our Worm Tea, let’s look at different types of microbial tea and the different methods of making it. Then we can get into how we do it, and why we do it that way. The basic recipe of compost tea consists of compost (the source of the beneficial microbes), a food source for the microbes (typically molasses) and water (distilled, rain or well water; using municipal water straight from the tap can kill the microbes because of added chemicals like chlorine). Other things can be added to give the finished product a more complex microbial population or nutrients. But those are the basics. For a simple recipe, just throw a pound or two of compost into the bottom of a five-gallon bucket, add a half cup of black strap molasses and fill the bucket with distilled water. Let it sit in the sun for a few days, and you’ll begin seeing some film, froth and bubbles. This is evidence of your microbial population growing. You could simply add this to your plants and soil. The problem with this method is it’s a little haphazard. First, it’s anaerobic, meaning there’s no added oxygen, so you can often end up with dangerous microbes. Second, traditional hot compost isn’t very uniform. It might not be completely “finished” (meaning it might contain pathogens or materials that aren’t necessarily beneficial), it could be too “finished” (meaning it lacks any sort of nutrients), and since different materials break down differently, every batch of hot compost is completely different from the next. To create a safer compost tea, you could consider adding oxygen by way of an aquarium or pond aerator. Simply use the ingredients from above, but then plunk some aeration stones attached to an aerator and let it bubble for a couple days. This will give you an aerobic (active in the presence of oxygen) tea. The problem you might face now is a product that doesn’t come out of a spray bottle cleanly. With your compost simply tossed into the bucket, you’re going to have chunks and slurry in the finished product. To fix this, use an old pair of panty hose. Or a burlap sack. So now comes the question: What’s the difference between tea made with traditional hot compost and tea made with vermicompost (like our Living Worm Compost)? Difference #1: Vermicompost is completely “finished.” You never have to worry about semi-composted chunks of matter (sometimes containing pathogens) getting into your tea. When a worm eats the organic material and poops it out, it’s done. It gives you a more uniform result because vermicompost itself is more uniform than hot compost. Difference #2: Unlike traditional hot compost, which often has all the nutrients leach out or get destroyed by the high temperatures, vermicompost still contains trace amounts of nutrients. That’s good for your plants. At the end of the day, tea—whether it’s made from hot compost or vermicompost—is meant to give your soil and plants a boost of microbes. Those microbes, both fungi and bacteria, help break down organic matter in your soil and serve as an anti-fungal agent. Without life in your soil, your plants will suffer. So now on to how we make our Good Sweet Earth Worm Tea: We use specially-made compost tea bags that we fill with our Living Worm Compost. We also add a special blend of alfalfa meal and kelp for added growth hormones and iron, respectively. To that we will add black-strap molasses. We add the water from our underground aquafer (fancy way of saying “our well”) and turn on the large pond bubbler. The whole thing is done inside our 100-gallon tank, which we can use to apply it directly to lawns, transfer into a farmer’s irrigation tank, or put into jugs and buckets for individual use. We let the tea brew for between 24 and 72 hours (earlier in the season, when temps are still cool, it takes longer to get the microbe population up to where it needs to be; in mid- to late-summer, the microbes multiply faster in the heat). Now when it comes to brewing our Worm Tea for use on lawns, we’ll at times add other ingredients based on the needs of a customer’s turf at any given time. Sometimes we’ll add more kelp extract, sometimes we’ll add another bit of alfalfa. If we want more a more fungal tea (not typical for lawns), we can add oats or spent distillers grains. If we want a more bacterial tea (good for lawns), fish emulsion or additional sugars (maple syrup, cane sugar, etc) can be added. For the tea that we sell at farmers markets and on our website, our recipe is pretty standard: Living Worm Compost, aquafer/rain water, kelp, molasses, alfalfa meal. This is the recipe that we’ve found gives the best results, and it keeps things consistent for everyone that uses it. And there it is. It sounds relatively simple, and at its core, it is. However, what we’ve been working on over the past several years is ingredient ratios, brew time and oxygen levels. And that’s where we feel like we’ve hit the sweet spot. If you’re interested in purchasing our tea (available only in West Michigan), check out our product page. Be aware: Since it does contain living organisms, you will need to use it within 8 hours of getting it. 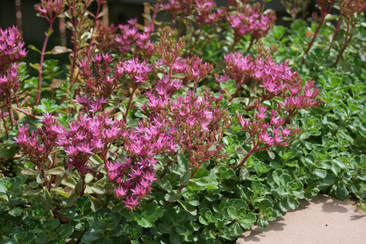 Dragon's Blood sedum Dragon's Blood sedum Sedum is an amazing ground cover that can survive in even the most-neglected areas. It's is an evergreen succulent perennial that grows 2 to 9 inches tall, and does well in both sun and partial shade. It does well even with just moderate watering—and actually too much water can kill them. These are great plants to put between pavers or in areas you want to break up the monotony of your turf. They also go well in beds, as accents, or as borders. There are dozens of varieties available, which offer eye-catching foliage and star-shaped blooms. Goldmoss stonecrop is a beautiful variety that has small, moss-like leaves and tiny flowers in the spring; it grows only a few inches tall but spreads up to two feet wide. The Dragon’s Blood variety grows a little taller than the goldmoss, and leaves turn a deep red in the cool temps of autumn; in summer the red flowers contrast beautifully with the green leaves. Whether you’re looking to fill in spaces in your yard or break up the monotony of your lawn, you really can’t go wrong with the evergreen sedum.  For most people, when they think about protein, they think meat. But there are plenty of vegan-friendly options for getting your protein, that you can grow right in your own garden. Here are some of our favorites with tips for growing and cooking from Melissa Halas-Liang, MA, RDN, CDE, dietitian and avid gardener (Source Rodale's Organic Life). I've included a scale detailing how easy (or hard) that plant is to grow for the average gardener (1 being very difficult, 5 being very easy): 1. Brocolli. One of our family's favs, but not necessarily easy to grow. Ease of growing: 2 Broccoli is a legit superfood. Not only does the cool-season crop deliver fiber and protein—1 cup has 2.5 grams of each—“it’s an excellent source of cancer-fighting phytonutrients and vitamin C for your immune system,” says Halas-Liang. (Here's exactly what to eat in a day to reduce your risk of cancer.) The florets are great in stirfries, pureed into soups, or eaten raw with dip—and you can turn the stems into slaw. To avoid mushy broccoli, don’t overcook it, warns Halas-Liang: “Cook until it’s tender and crisp and still bright green.” 2. Edamame. A perfect addition to stir-frys, or as a steamed snack. Ease of growing: 5 With all nine essential amino acids, it’s as close to animal protein as it gets; plus, a study in the International Journal of Obesitylinked soy protein to fat burning and weight loss. As well as delivering 10 grams protein per ½ cup, the green beans are rich in isoflavones and omega-3 fatty acids, inflammation-fighters linked to decreased heart attack risk and reduced symptoms of menopause. Add organic edamame to guacamole or hummus, mash into a toast topper, or eat straight up with a sprinkle of salt. 3. Asparagus. Don't start these from seed, as you can only harvest in the second year. Buy and plant one-year crowns. But once they're going, they're perennials, so you'll always have them. Ease of growing: 4 The spring spears contains 3 grams protein and 3 grams fiber per cup—all for a measly 27 calories. Asparagus also delivers a hefty dose of heart-healthy folate, and inulin to support digestion and healthy gut bacteria. “Asparagus is delicious shaved,” says Halas-Liang, who uses a vegetable peeler to turn it into ribbons for salads. It’s also tasty steamed, broiled, or sautéed. 4. Peas. Another favorite in our house, and very easy to grow. Ease of growing: 5 These glorious green pods that arrive in late spring are packed with protein (4 grams per ½ cup), as well as mood-boosting folate, heart-healthy fiber, and almost half of your vitamin C needs for the day...Toss snow peas or snap peas into stirfries and pastas, puree shelled garden peas into soups, or pair with mint in a salad. (Here's how to pre-sprout your peas to give them a head start and boost yields.) 5. Kale. Young leaves are good in salads, more mature leaves are great sauteed or in soups. Make sure to "massage" the leaves in your prep to make them less tough. Ease of growing: 5 When it comes to leafy greens, kale takes the protein prize, with more of the macronutrient than spinach, collards, and mustard greens—and double that of Swiss chard. One cup also delivers more than your daily dose of immune-boosting vitamin A and bone-building vitamin K. Plus, it’s a good source of calcium. Chop it into salads, puree it into pesto, bake it into kale chips, or try it on this ridiculously delicious kale and lemon pizza. 6. Sunflower seeds. A delicious snack. Sunflowers are relatively easy to grow, and they're a beautiful addition to your yard, but they're a direct sow; you can't start them and transplant them later. Ease of growing: 3 The glorious annual can stretch over 4 meters tall with a flower head 12 inches across, which is where the kernel comes from. As well as providing protein (¼ cup delivers 6 grams), the seeds are rich in linoleic acid, a polyunsaturated fat linked to weight loss. Plus, they’re a super source of vitamin E and selenium for gorgeous skin. Add sunflower seeds to oatmeal parfaits, cookies, muffins, salads, and pesto. Here's how to harvest sunflower seeds. |
