
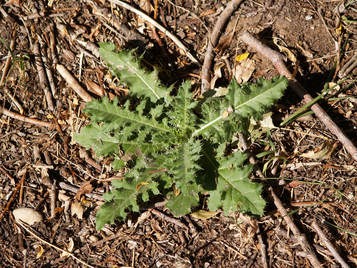
 You might not know its name, but chances are you’ve dealt with Canada thistle (Cirsium arvense) at some point in your yard. I call it the Devil Weed, because, man, it is just straight-up evil. Thorny, persistent, invasive—those are just a few of the adjectives you could use to describe the Canada thistle (I have a few R-rated adjectives as well, but I’ll leave those to your imagination).
Canada thistle has an extensive and winding root system that can grow quite deep. It’s got green leaves that are lobed and covered in spikes, and it grows in a low pinwheel along the ground. If it goes to flower, it produces a cluster of purple balls that will eventually turn white like a dandelion head and disperse fluffy seed across the landscape. A new plant is often able to grow from even a tiny piece of root left in the soil. And because of this, there is no quick and easy way to get rid of Canada thistle, especially without chemicals. Taking care of it organically is going to be a process. But it is possible. Step one in getting rid of Canada thistle is to make your yard and garden a hostile place to this Devil Weed—and that actually means making your soil more fertile. While Canada thistle can actually grow anywhere, it thrives in less fertile soil and in open spaces without ground cover. We’ve been dealing with an infestation of Canada thistle for the past three years at the Good Sweet Earth homestead. Just before we moved in, a new septic system was installed, which meant a whole lot of fill dirt being added to our front yard. Our first summer had us scrambling to figure out what to do with this wide-open area of bare soil. We settled on installing a large country garden, with new turf around it. Unfortunately, before we could really install the stuff we wanted (plants, flowers, grass seed), some real nasty stuff installed itself—including a large amount of Canada thistle. I mean, this area was prime real estate for this stuff: low-fertility fill dirt in an area with no ground cover. So over time, we’ve begun making a dent in eliminating this nasty, thorny weed from our yard—but that’s the thing: it takes time. We’ve amended the soil, we’ve installed ground cover (both organic and non-organic), and we’ve been attack the plants themselves (without chemicals, of course). And here’s how you go about attacking Canada thistle: Your first instinct might be to pull this thing out of the ground. But I’m here to tell you that pulling it is the wrong way to go about it. First of all, your fingers will pay the price for grabbing onto this thorny plant—even gloves are no match for the nasty pickers of the Canada thistle. Second, when pulling a Canada thistle out of the ground, you risk splitting the root; doing so will not only bring this nasty plant back, he’ll bring a friend—two will now grow in the place of the original. Instead of pulling, I suggest cutting. Get a pair of scissors and cut it off at the ground level. Every few days, cut any new growth. By doing so, you’re forcing the plant to use its energy reserves to re-grow itself, but you’re cutting off the part of the plant that actually builds up new energy (the leaves). Eventually, you’ll see your Canada thistle population go down. It might not be quick, in fact, it’ll take a while, especially if you’re working on building up your soil’s fertility. But eventually, this Devil will be gone.
0 Comments
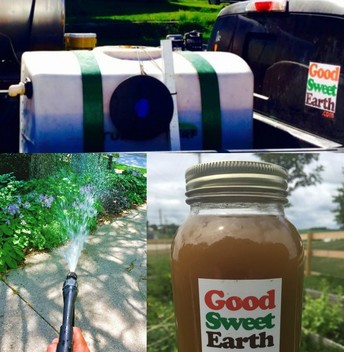 If you’re familiar with compost tea, our Worm Tea is similar, except instead of using traditional hot compost (or thermophilic compost), we use our own Living Worm Compost. Our Worm Tea is sold by the gallon to backyard gardeners for flowers, fruits, veggies, shrubbery and as a compost pile activator. It’s also used by farmers on their crops as a microbial drench and anti-fungal agent. Finally, we use it on lawns.
Before we get into how we make our Worm Tea, let’s look at different types of microbial tea and the different methods of making it. Then we can get into how we do it, and why we do it that way. The basic recipe of compost tea consists of compost (the source of the beneficial microbes), a food source for the microbes (typically molasses) and water (distilled, rain or well water; using municipal water straight from the tap can kill the microbes because of added chemicals like chlorine). Other things can be added to give the finished product a more complex microbial population or nutrients. But those are the basics. For a simple recipe, just throw a pound or two of compost into the bottom of a five-gallon bucket, add a half cup of black strap molasses and fill the bucket with distilled water. Let it sit in the sun for a few days, and you’ll begin seeing some film, froth and bubbles. This is evidence of your microbial population growing. You could simply add this to your plants and soil. The problem with this method is it’s a little haphazard. First, it’s anaerobic, meaning there’s no added oxygen, so you can often end up with dangerous microbes. Second, traditional hot compost isn’t very uniform. It might not be completely “finished” (meaning it might contain pathogens or materials that aren’t necessarily beneficial), it could be too “finished” (meaning it lacks any sort of nutrients), and since different materials break down differently, every batch of hot compost is completely different from the next. To create a safer compost tea, you could consider adding oxygen by way of an aquarium or pond aerator. Simply use the ingredients from above, but then plunk some aeration stones attached to an aerator and let it bubble for a couple days. This will give you an aerobic (active in the presence of oxygen) tea. The problem you might face now is a product that doesn’t come out of a spray bottle cleanly. With your compost simply tossed into the bucket, you’re going to have chunks and slurry in the finished product. To fix this, use an old pair of panty hose. Or a burlap sack. So now comes the question: What’s the difference between tea made with traditional hot compost and tea made with vermicompost (like our Living Worm Compost)? Difference #1: Vermicompost is completely “finished.” You never have to worry about semi-composted chunks of matter (sometimes containing pathogens) getting into your tea. When a worm eats the organic material and poops it out, it’s done. It gives you a more uniform result because vermicompost itself is more uniform than hot compost. Difference #2: Unlike traditional hot compost, which often has all the nutrients leach out or get destroyed by the high temperatures, vermicompost still contains trace amounts of nutrients. That’s good for your plants. At the end of the day, tea—whether it’s made from hot compost or vermicompost—is meant to give your soil and plants a boost of microbes. Those microbes, both fungi and bacteria, help break down organic matter in your soil and serve as an anti-fungal agent. Without life in your soil, your plants will suffer. So now on to how we make our Good Sweet Earth Worm Tea: We use specially-made compost tea bags that we fill with our Living Worm Compost. We also add a special blend of alfalfa meal and kelp for added growth hormones and iron, respectively. To that we will add black-strap molasses. We add the water from our underground aquafer (fancy way of saying “our well”) and turn on the large pond bubbler. The whole thing is done inside our 100-gallon tank, which we can use to apply it directly to lawns, transfer into a farmer’s irrigation tank, or put into jugs and buckets for individual use. We let the tea brew for between 24 and 72 hours (earlier in the season, when temps are still cool, it takes longer to get the microbe population up to where it needs to be; in mid- to late-summer, the microbes multiply faster in the heat). Now when it comes to brewing our Worm Tea for use on lawns, we’ll at times add other ingredients based on the needs of a customer’s turf at any given time. Sometimes we’ll add more kelp extract, sometimes we’ll add another bit of alfalfa. If we want more a more fungal tea (not typical for lawns), we can add oats or spent distillers grains. If we want a more bacterial tea (good for lawns), fish emulsion or additional sugars (maple syrup, cane sugar, etc) can be added. For the tea that we sell at farmers markets and on our website, our recipe is pretty standard: Living Worm Compost, aquafer/rain water, kelp, molasses, alfalfa meal. This is the recipe that we’ve found gives the best results, and it keeps things consistent for everyone that uses it. And there it is. It sounds relatively simple, and at its core, it is. However, what we’ve been working on over the past several years is ingredient ratios, brew time and oxygen levels. And that’s where we feel like we’ve hit the sweet spot. If you’re interested in purchasing our tea (available only in West Michigan), check out our product page. Be aware: Since it does contain living organisms, you will need to use it within 8 hours of getting it. 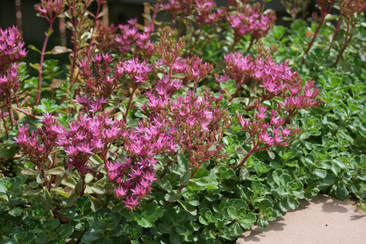 Dragon's Blood sedum Dragon's Blood sedum Sedum is an amazing ground cover that can survive in even the most-neglected areas.
It's is an evergreen succulent perennial that grows 2 to 9 inches tall, and does well in both sun and partial shade. It does well even with just moderate watering—and actually too much water can kill them. These are great plants to put between pavers or in areas you want to break up the monotony of your turf. They also go well in beds, as accents, or as borders. There are dozens of varieties available, which offer eye-catching foliage and star-shaped blooms. Goldmoss stonecrop is a beautiful variety that has small, moss-like leaves and tiny flowers in the spring; it grows only a few inches tall but spreads up to two feet wide. The Dragon’s Blood variety grows a little taller than the goldmoss, and leaves turn a deep red in the cool temps of autumn; in summer the red flowers contrast beautifully with the green leaves. Whether you’re looking to fill in spaces in your yard or break up the monotony of your lawn, you really can’t go wrong with the evergreen sedum. 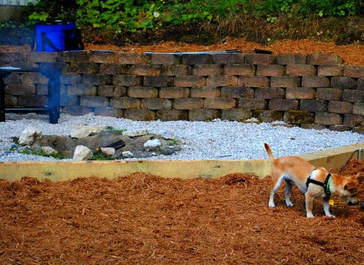 I’m a lawn guy, so naturally, my thoughts turn to grass when someone mentions “ground cover.” But that isn’t the only option. There are plenty of other options of living ground covers you could opt for your in yard: from overseeding some clover into your lawn all the way to including larger sections of ivy, hostas, vinca or even wild strawberries into the design.
But what about inorganic ground cover? The use of wood mulch or pavers or crushed stone are legitimate ways to spruce up your yard, and they’re great ways to cut back on the use of fertilizer and water. Around the Good Sweet Earth homestead, we’ve opted for a couple alternative ground covers to make things a little more interesting: A large country garden filled in with red mulch in our front yard, and in the immediate are around our fire pit we’ve got crushed limestone, with more red mulch framing it in. The contrast between the green and red and white in these areas is beautiful in the summer. Using areas of non-living ground cover allow homeowners to create spaces of color, interesting patterns and textural and color contrasts. The red mulch we’ve placed in a fan-shape around our fire pit is a stunning contrast with the green grass in the summer. Same goes for the country garden in the front yard. Those areas also mean less grass to maintain, while keeping weeds to a minimum. So when deciding whether to go with a living or non-living ground cover, you should consider both design and function. For design: Non-living ground covers can help unify your landscape, just like plants can, while creating a nice contrast between spaces. Consider the lines you’ll create with non-living materials, and how it draws the eye around your yard. The fan-shaped area of mulch in our yard leading up to the fire pit sets the fire pit area as a focal point. Also, putting pavers in can definitely create eye movement around your yard, especially when installed as a pathway. For function: Consider foot traffic. Non-living ground covers do well in high-traffic areas. They can also help guide traffic (paver paths, for instance). A nice alternative to grass or plant would be square stepping stones surrounded by similarly-colored gravel; you could do something like this leading out to your garage or play area to cut back on grass upkeep, as well as keeping foot traffic off of the lawn itself. So once you’ve decided to add some non-living ground cover to your yard, do you go with organic (wood mulch) or inorganic material (stones)? Cost is one factor to consider. Stone materials cost more upfront, but it’s often a one-time cost. Woody materials cost less, but they’ll break down over time and you’ll need to buy more in a year or two. Location is another thing to consider. When putting a non-living ground cover right next to your house rocks will provide a less-hospitable living space for pests that may ultimately invade your home. A woody mulch that stays cool and damp often becomes home to little critters (like millipedes, earwigs, spiders), and they could make their way into your house, especially as the weather cools in the fall. Finally, when using non-living ground covers, try to find colors and textures that complement each other overall, and work well with your existing plants and style. Don’t mix things up too much—stick with one color mulch throughout your yard, stick with one type and color of stone throughout your yard, etc. Non-living ground covers are a great way to add areas of interest throughout your yard (and break up large chunks of greenspace), but they’re also good for the environment, as you’ll have less turf to water, fertilize and mow. 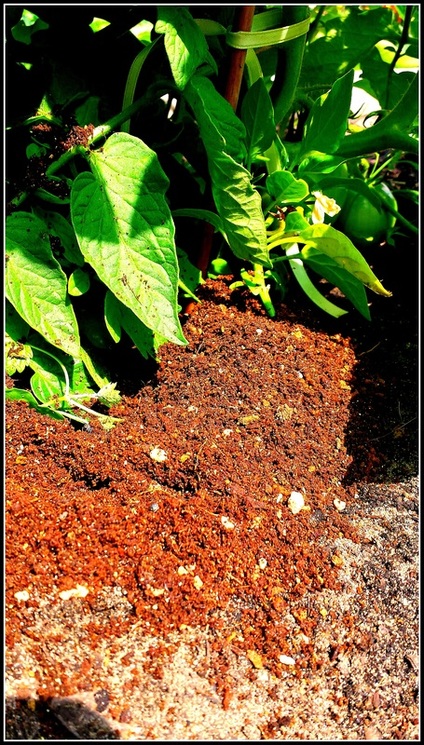 A tomato plant top-dressed with Good Sweet Earth's Bold Tomato-- July 7, 2016 A tomato plant top-dressed with Good Sweet Earth's Bold Tomato-- July 7, 2016 Back in the spring, as you were getting your garden ready for the year, you most likely worked some compost into your soil (hopefully Good Sweet Earth's Living Worm Compost!), you planted your garden and now you are waiting for those first red tomatoes of the year… or maybe you’re already enjoying some fruits of your labor. So there’s nothing left to be done, but pick cucumbers and make pickles, right? Unfortunately, no. Your plants continue to need nutrients throughout the season!
Now if you’re growing your garden the right way—organically, with no chemicals-- that means Miracle Gro isn’t an option at this point. But the plants still need some food—so what do you do? Six words: Top dress, top dress, top dress. If you want to maintain your chemical-free organic garden, and see amazing results, you need to top dress your plants at least once during the growing season. This tried and true organic garden practice is easy and your plants will flourish. I’m serious, they’ll absolutely explode. In fact, I’ve seen a tomato plant more than double its production from year to year when top dressed with Worm Compost. Here’s what you do: take some Living Worm Compost and place a layer around the base of your plant approximately ½ inch think and 3 inches wide. After spreading it around your plants water deeply to let the nutrients go down into the soil. Take care not to spread compost in the bare spots in the garden as you don’t want to feed the weeds! Here’s the best part: Living Worm Compost can be applied as often as you like—you’re never gonna overdo it or burn the plants. But at a minimum, you need to do it at the beginning of the season and again when your plants start fruiting. Pair Living Worm Compost with our Worm Tea and you’ll see some amazing results! Did you know that Living Worm Compost can also be used on potted plants as well as your lawn? If it grows in soil, Living Worm Compost will feed it! Try a bag, and see how much of a difference top dressing can make. If you've got tomatoes, try top dressing with Bold Tomoto. Got roses? Try Dulce Rosa. You'll be amazed by the results! -Corey Veldheer, Certified Master Gardner, Michigan State University Extension & owner of Good Sweet Earth |